Tutorial Intro
Let's discover Docusaurus in less than 5 minutes.
Getting Started
Get started by creating a new site.
Or try Docusaurus immediately with docusaurus.new.
What you'll need
- Node.js version 16.14 or above:
- When installing Node.js, you are recommended to check all checkboxes related to dependencies.
Generate a new site
Generate a new Docusaurus site using the classic template.
The classic template will automatically be added to your project after you run the command:
npm init docusaurus@latest my-website classic
You can type this command into Command Prompt, Powershell, Terminal, or any other integrated terminal of your code editor.
The command also installs all necessary dependencies you need to run Docusaurus.
Start your site
Run the development server:
cd my-website
npm run start
The cd command changes the directory you're working with. In order to work with your newly created Docusaurus site, you'll need to navigate the terminal there.
The npm run start command builds your website locally and serves it through a development server, ready for you to view at http://localhost:3000/.
Open docs/intro.md (this page) and edit some lines: the site reloads automatically and displays your changes.
安装
按照官方文档安装
这个和我的想法很像^_^
把导航菜单Tutorial改为了Docusaurus Tutorial
Deploying Docusaurus site to GitHub the easy way | William's GitHub Pages
Deploying to GitHub Pages with custom domain
- 修改和添加配置
# docusaurus.config.js

// GitHub pages deployment config.
// If you aren't using GitHub pages, you don't need these.
organizationName: 'wecms', // Usually your GitHub org/user name.
projectName: 'icmsite-docusaurus', // Usually your repo name.
deploymentBranch: 'gh-pages',
trailingSlash: false, // GitHub Pages adds a trailing slash to Docusaurus URLs by default
- 添加文件
./static/CNAME
文件内容只有一行,自定义域名doc-github.prodev.cn
如果不添加此文件,后续每次部署时,域名会丢失哦!
- 添加
./static/deploy.shshell脚本
为了缩短命令我像vuepress那样,写在了一个shell脚本中:
#!/usr/bin/env sh

# 确保脚本抛出遇到的错误
set -e

# 设置 Git 用户名
export GIT_USER=icms

# 设置 Git 连接方式
export USE_SSH=true

# 部署
yarn deploy
然后在中添加以下命令
"scripts": {
  "shell": "sh ./static/deploy.sh",
},
最后只要运行npm run shell即可部署了。
WARNING
By default, GitHub Pages runs published files through Jekyll. Since Jekyll will discard any files that begin with _, it is recommended that you disable Jekyll by adding an empty file named .nojekyll file to your static directory.
Environment settings
- USE_SSH: Set to true to use SSH instead of the default HTTPS for the connection to the GitHub repo. If the source repo URL is an SSH URL (e.g. git@github.com:facebook/docusaurus.git), USE_SSH is inferred to be true.
- GIT_USER: The username for a GitHub account that has push access to the deployment repo. For your own repositories, this will usually be your GitHub username. Required if not using SSH, and ignored otherwise.
环境变量是一种可以被进程访问的变量,它们存储着关于系统环境和配置的信息。当一个变量被导出为环境变量时,这个变量可以被当前Bash终端中的其他进程和子进程所访问和使用。
比如我的这样写:
GIT_USER=icms USE_SSH=trueGIT_USER=icms USE_SSH=true
# 查看当前Git Bash环境变量
echo $GIT_USER
echo $USE_SSH
在 shell 脚本中,export 关键字用于将变量导出为环境变量。
#!/bin/bash

# 设置 Git 用户名
export GIT_USER=<your-username>

# 设置 Git 连接方式
export USE_SSH=true

# 提交代码
git commit -m "Commit message"
Error
fatal: Remote branch gh-pages not found in upstream origin
[INFO] `git clone --depth 1 --branch gh-pages git@github.com:wecms/icmsite-docusaurus.git "C:\Users\Admin\AppData\Local\Temp\icmsite-docusaurus-gh-pagesN1OoRT"` code: 128
Initialized empty Git repository in C:/Users/Admin/AppData/Local/Temp/icmsite-docusaurus-gh-pagesN1OoRT/.git/
[INFO] `git init` code: 0
Switched to a new branch 'gh-pages'
因为没有初始化Git仓库。
git init
git set origin
报错2
fatal: ambiguous argument 'HEAD': unknown revision or path not in the working tree
Use '--' to separate paths from revisions
因为没有分支信息,提交一次到master分支后,解决了。
Admin@DESKTOP-TCU7QHA MINGW64 /d/Hostv/icmsite-docusaurus/icmsite-docusaurus (master)
$ GIT_USER=icms USE_SSH=true yarn deploy
yarn run v1.22.17
$ docusaurus deploy
[INFO] Deploy command invoked...
[INFO] organizationName: wecms
[INFO] projectName: icmsite-docusaurus
[INFO] deploymentBranch: gh-pages
[INFO] Remote repo URL: git@github.com:wecms/icmsite-docusaurus.git
cf8af11bd4ba06d1f78203e5f3d6f13ff0b59bde
[INFO] `git rev-parse HEAD` code: 0
[INFO] [en] Creating an optimized production build...
i Compiling Client
i Compiling Server
√ Client: Compiled successfully in 5.33s
√ Server: Compiled successfully in 9.06s
[SUCCESS] Generated static files in "build".
推送分支时触发部署with GitHub Actions
- 修改Github仓库设置
GitHub Pages Settings
Build and deployment
Source: 选择 Github Actions
- 编写Workflows文件
新建两个文件
- .github/workflows/deploy.yml
- .github/workflows/test-deploy.yml
- 完成
现在推送任意提交到main分支(或者在workflows文件中指定的其他分支), 即可触发GitHub Action, 自动构建并部署GitHub Pages
报错
Error: Dependencies lock file is not found in /home/runner/work/icmsite-docusaurus/icmsite-docusaurus. Supported file patterns: yarn.lock
通过在.github\workflows\deploy.yml中添加cache-dependency-path也不行
# .github\workflows\deploy.yml
cache-dependency-path: ./frontend/yarn.lock
TIL: GitHub Actions | Fix "Error: Dependencies lock file is not found" - DEV Community
GitHub actionsのseup-node@v3で Dependencies lock file is not found
改成使用npm,成功了
These files assume you are using Yarn. If you use npm, change cache: yarn, yarn install --frozen-lockfile, yarn build to cache: npm, npm ci, npm run build accordingly.
fatal: unable to access 'https://github.com/wecms/icmsite-docusaurus.git/': The requested URL returned error: 403
You have to configure your repository - Settings -> Action -> General -> Workflow permissions and choose read and write permissions
Permission denied to github-actions[bot]. The requested URL returned error: 403 - Stack Overflow
不小心点了“Unpublish site”
网页打不开了,重新发布,需要重新设置一下:
Github Page 不更新
看到Github Actions成功执行了,但是不更新。
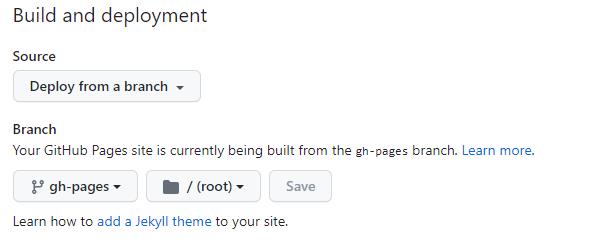
把gh-pages分支删除了,然后在GitHub Pages Settings页面重新做了一次Build and deployment,保存后,更新再推送,更新了一次,下次推送又不更新了。
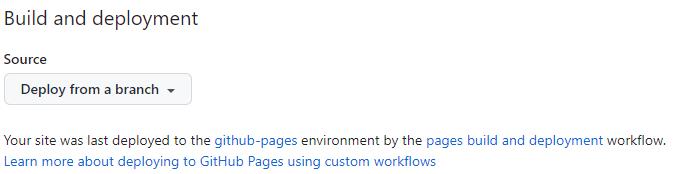
后来发现是GitHub Pages 站点的发布源设置错误。
使用GitHub Actions以后,GitHub Pages 站点的发布源还要设置为:deploy from a branch
改为deploy from a branch以后,每次推送都更新,执行了两个步骤
- Deploy to GitHub Pages
- pages-build-deployment
不知这样设置对不对,后续还要研究一下。下面是参考文档
- GitHub gh-pages 更新 不生效
- deployment docusaurus with GitHub Actions时 publishing source怎么设置?
- GitHub Pages Build and deployment Source GitHub Actions 和 Deploy from a branch有什么区别?
- deploy docusaurus with GitHub Actions时publishing source为什么还要选择deploy from a branch
- source 什么时候选择GitHub Actions
为什么我的GitHub页面不更新其内容? - 问答 - 腾讯云开发者社区-腾讯云 Deployment | Docusaurus 配置 GitHub Pages 站点的发布源 - GitHub 文档
其他参考
- Github Action 精华指南 - 知乎
- 关于 GitHub Actions 的计费 - GitHub 文档
- VS Code中写mardown直接粘贴图片的神器 | Chunlei Li
- GitHub Actions 文档 - GitHub 文档
参考文档
- gitbug pages unpublished 重新发布
- 取消发布 GitHub Pages 站点 - GitHub 文档
- 配置 GitHub Pages 站点的发布源 - GitHub 文档
- Publish again unpublished github pages project - Stack Overflow
- 创建Github.io Page后不小心unpublish了, 如何重新发布_小电动车的博客-CSDN博客
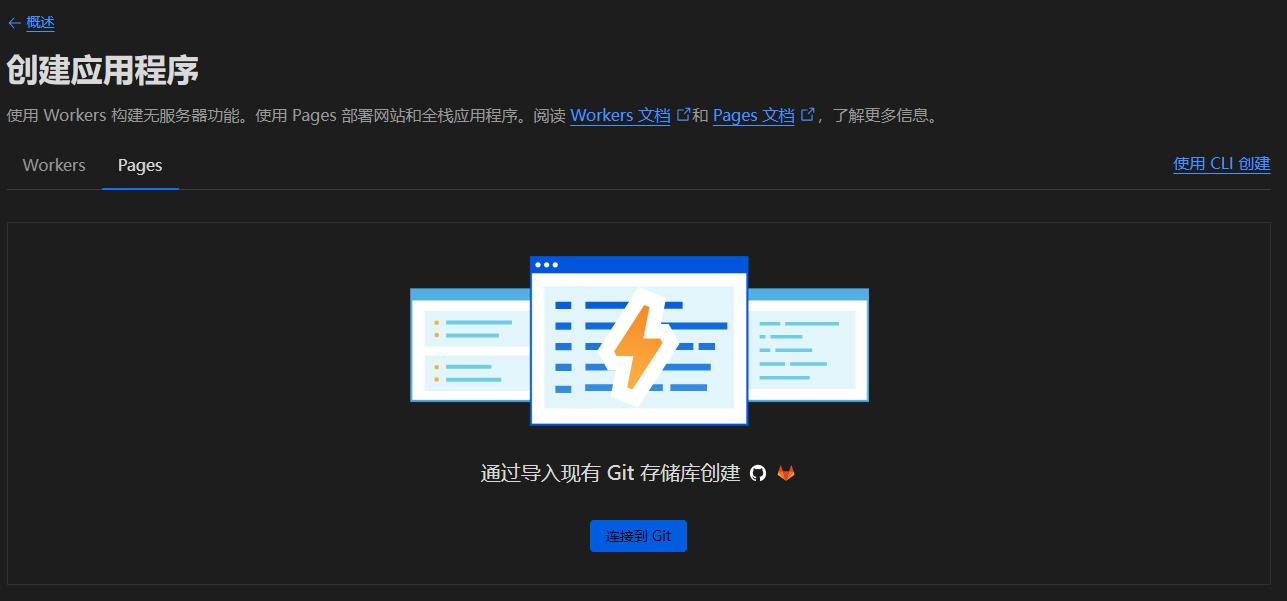
推送分支时触发部署with Cloudflare Pages
在Workers 和 Pages概述页面,点击“创建应用程序”
选择pages
通过导入现有 Git 存储库创建
根据向导,选择一个Github中的存储库,我这里没有全部授权,每添加一个应用需要重新授权选择一个Github仓库。
添加环境变量
NODE_VERSION=16
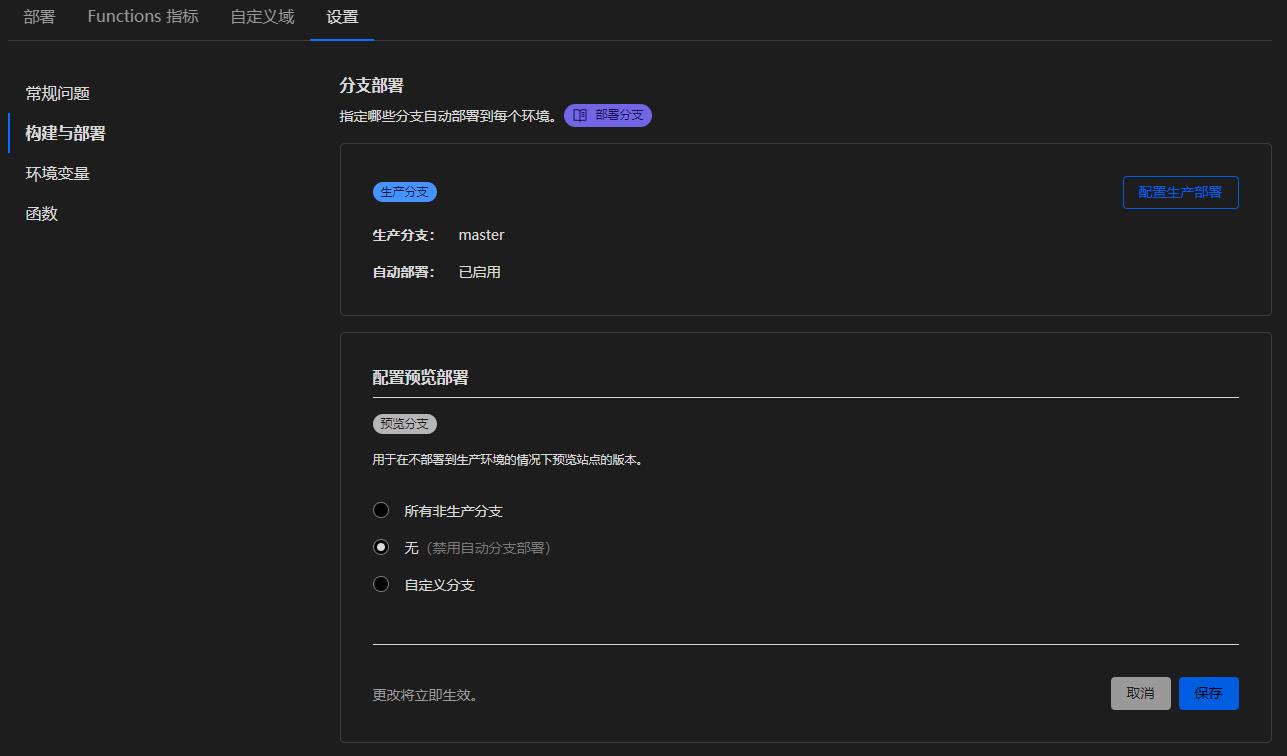
Cloudflare Pages 发布前分支预览
Cloudflare Pages -支持发布时分支预览
发现部署列表中有好多“预览分支”构建失败的信息:
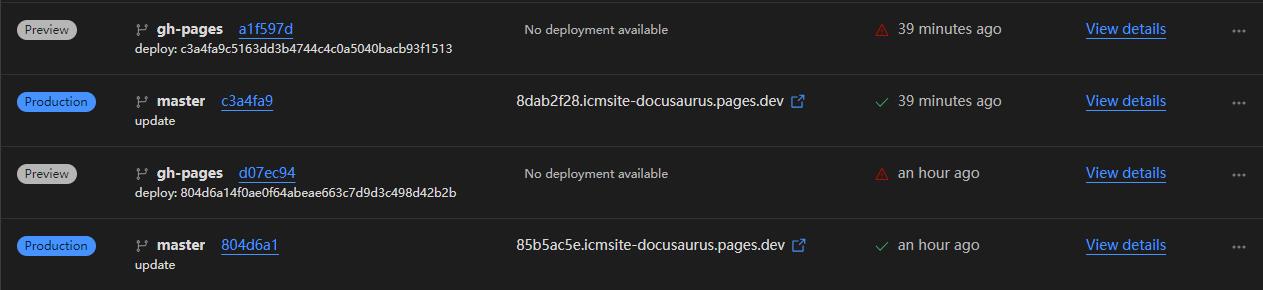
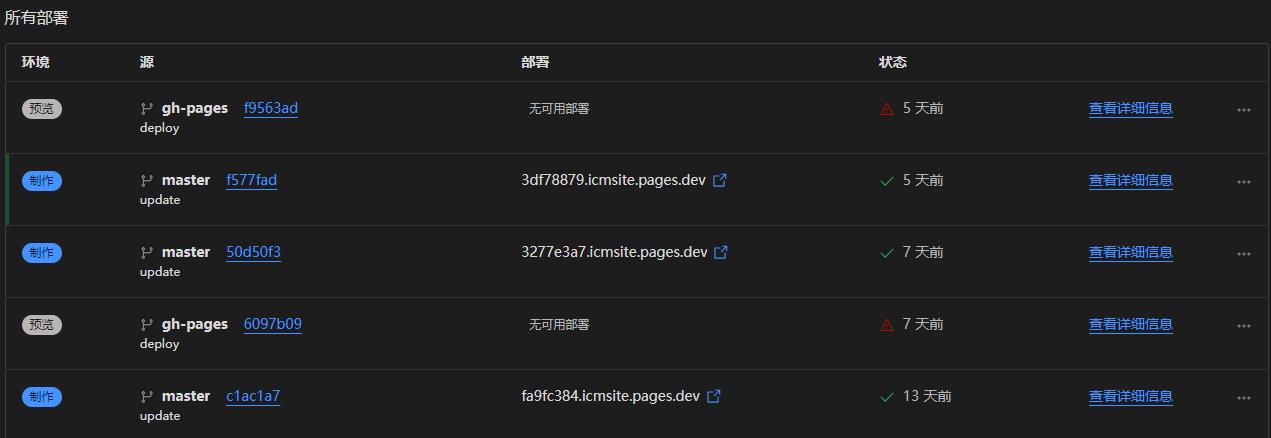
这是因为cloudflare默认所有非生产分支,我这里gh-pages一更新就会自动构建和部署,但是我这个分支是用于github pages的静态页面,没有构建所需的
这个错误其实可以忽略,反正也是部署失败,不想看到并列出此错误,可以关闭预览分支部署功能。
参考文献
- cloudflare 预览分支 自动部署
- cloudflare gh-pages 预览
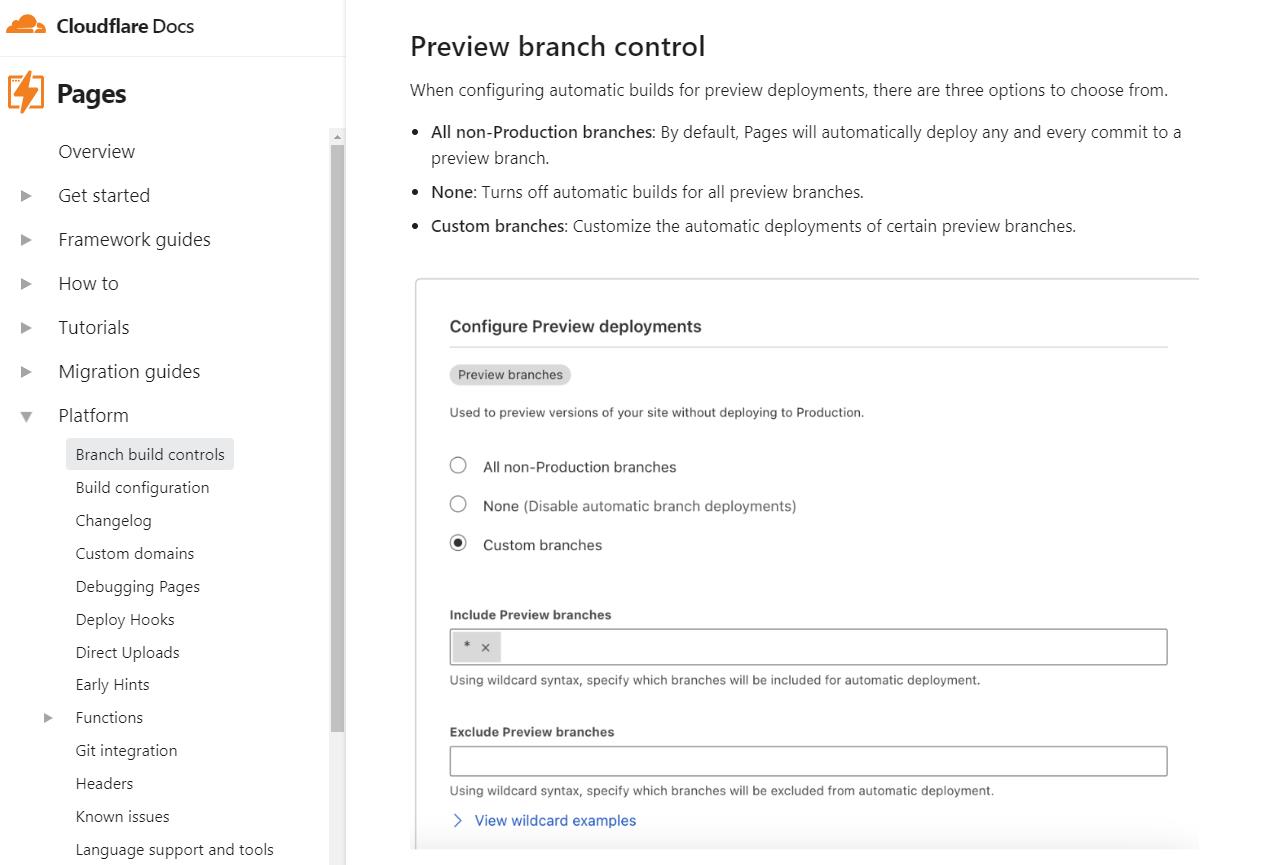
- Branch build controls · Cloudflare Pages docs
- 使用 Cloudflare Pages 部署静态网站 - Keenwon's Blog
- 将博客部署在 Cloudflare Pages - Dvel's Blog
- 使用 Cloudflare Pages 构建全栈应用
Docusaurus 怎么设置默认为dark mode?
导航到 docusaurus.config.js 文件,这是 Docusaurus 的配置文件。
找到 themeConfig 部分,然后在其中添加一个 defaultMode 属性,将其设置为 "dark"。
module.exports = {
  // 其他配置项...
  themeConfig: {
    // 其他主题配置...
    colorMode: {
        defaultMode: 'dark',
        disableSwitch: false,
      }
  },
};
保存文件并重新启动 Docusaurus 项目。
Docusaurus 代码块 code block 怎么设置默认为换行 显示行号
根据相关文档:
- {11-14,21-23,10} 高亮用
- title=docusaurus.config.js 显示标题引用的文件
- showLineNumbers 显示行号
'classic',
  /** @type {import('@docusaurus/preset-classic').Options} */
  ({
    docs: {
      sidebarPath: require.resolve('./sidebars.js'),
      // Please change this to your repo.
      // Remove this to remove the "edit this page" links.
      editUrl:
        'https://github.com/facebook/docusaurus/tree/main/packages/create-docusaurus/templates/shared/',
      // 代码块
      codeBlock: {
       showLineNumbers: true,
       wrapLines: true, // Set this to true to enable word wrap
      },
    },
}),

prism: {
  theme: lightCodeTheme,
  darkTheme: darkCodeTheme,
  //additionalLanguages: ['powershell'],
  //showLineNumbers: true,
  //wrapLines: true, // Set this to true to enable word wrap
},
上述方法都不行
参考文献
- Docusaurus Code showLineNumbers default
- Docusaurus Code blocks set showLineNumbers
- Docusaurus plugins code toggle word wrap
站点更新
# 本地编译
npm run shell

# 本地测试
npm run start
线上部署
只须Git Push推送即可。